One of the biggest reasons agencies and store owners pick nopCommerce over a hosted platform is that almost nothing about it is off-limits. Payment methods, shipping calculators, tax providers, and even the widgets you see on the storefront are all built the same way custom extensions are: as plugins. Once you understand how to create a nopCommerce plugin, extending checkout, the admin panel, or a product page stops being a core-code-editing exercise and becomes a contained, upgrade-safe module.
This guide builds a real, installable nopCommerce 4.80 plugin from an empty folder to an entry under Configuration → Local Plugins. We'll cover the project structure, the IPlugin/BasePlugin lifecycle, wiring up an admin configuration page, and what changes — and what doesn't — compared to earlier nopCommerce versions.
Understanding the nopCommerce Plugin Architecture
nopCommerce doesn't bolt plugins on as an afterthought — its own payment, shipping, tax, and widget modules are implemented as plugins, discovered at startup and tracked in App_Data/plugins.json. That's a deliberate architectural choice documented in nopCommerce's own plugin system overview: everything installable through the admin's Local Plugins page follows one contract.
Key Fact: Every nopCommerce plugin implements the IPlugin interface from the Nop.Services.Plugins namespace — almost always indirectly, by inheriting the BasePlugin class, which already implements the boilerplate methods for you.
From there, nopCommerce layers on more specific interfaces depending on what your plugin actually does.
The Interfaces That Matter
Per the official 4.80 plugin guide, nopCommerce ships a family of specialized interfaces on top of IPlugin — pick the one that matches your plugin's job instead of reinventing its contract:
IPaymentMethod, IShippingRateComputationMethod, IPickupPointProvider, ITaxProvider, and IExchangeRateProvider cover checkout-adjacent logic.IExternalAuthenticationMethod, IMultiFactorAuthenticationMethod, and IDiscountRequirementRule hook into login and pricing rules.IWidgetPlugin renders content into storefront zones; IMiscPlugin is the catch-all for a plugin that doesn't fit the categories above.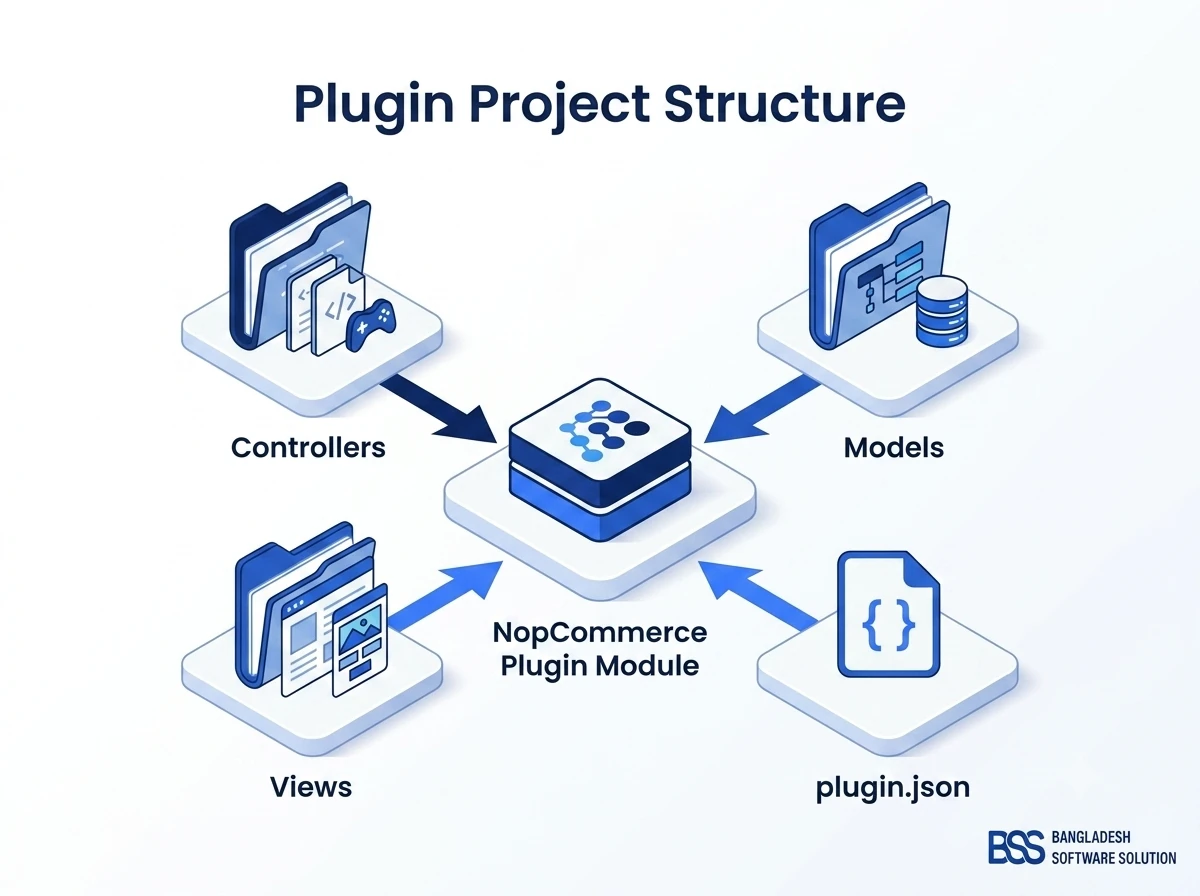
Setting Up Your Plugin Project
nopCommerce plugin projects follow a naming convention: Nop.Plugin.{Group}.{Name} — for example, Nop.Plugin.Misc.HelloWorld for a simple miscellaneous plugin. Add it as a Class Library referencing Nop.Web.Framework, targeting the same framework version as the store. nopCommerce 4.80 migrated to .NET 9, so your .csproj needs to match:
<Project Sdk="Microsoft.NET.Sdk">
  <PropertyGroup>
    <TargetFramework>net9.0</TargetFramework>
    <OutputPath>$(SolutionDir)\Presentation\Nop.Web\Plugins\Misc.HelloWorld</OutputPath>
    <CopyLocalLockFileAssemblies>true</CopyLocalLockFileAssemblies>
  </PropertyGroup>
  <ItemGroup>
    <ProjectReference Include="$(SolutionDir)\Presentation\Nop.Web.Framework\Nop.Web.Framework.csproj" />
  </ItemGroup>
</Project>
CopyLocalLockFileAssemblies matters more than it looks: without it, your plugin's own NuGet dependencies won't land next to the DLL, and nopCommerce will fail to load the assembly at runtime with a missing-dependency error that has nothing to do with your code.
Next to the project file, every plugin needs a plugin.json descriptor — this is what makes it discoverable under Local Plugins in the first place:
{
  "Group": "Misc",
  "FriendlyName": "Hello World Plugin",
  "SystemName": "Misc.HelloWorld",
  "Version": "1.00",
  "SupportedVersions": [ "4.80" ],
  "Author": "Your Company",
  "DisplayOrder": 1,
  "FileName": "Nop.Plugin.Misc.HelloWorld.dll",
  "Description": "A minimal example plugin for nopCommerce 4.80."
}
Required files for a working plugin:
- plugin.json — the descriptor above, set to copy to the output directory.
- A class implementing IPlugin — in practice, a class inheriting
BasePlugin. - Controllers/, Models/, Views/ — for the admin configuration screen, if your plugin has settings.
- _ViewImports.cshtml inside Views/ — without it, Razor won't resolve the tag helpers the admin theme uses.
- RouteProvider.cs — only if you need a custom route beyond default admin-area routing.
The Gotcha That Catches Almost Everyone First
Your Configure.cshtml view must have its Build Action set to Content and Copy to Output Directory set to Copy always. Miss this and the DLL builds fine, the plugin installs fine — and then the configuration page 404s, because the .cshtml file was never physically copied next to the assembly.
Implementing the Plugin Class and Registering Routes
With the project scaffolded, the plugin class itself is usually the smallest file in the solution. Inherit BasePlugin, override GetConfigurationPageUrl() to point at your admin controller action, and override the install/uninstall hooks if you need to seed settings or locale resources:
public class HelloWorldPlugin : BasePlugin, IMiscPlugin
{
    private readonly IWebHelper _webHelper;

    public HelloWorldPlugin(IWebHelper webHelper)
    {
        _webHelper = webHelper;
    }

    public override string GetConfigurationPageUrl()
    {
        return $"{_webHelper.GetStoreLocation()}Admin/HelloWorld/Configure";
    }

    public override async Task InstallAsync()
    {
        await SettingService.SaveSettingAsync(new HelloWorldSettings { Greeting = "Hello, world!" });
        await base.InstallAsync();
    }

    public override async Task UninstallAsync()
    {
        await SettingService.DeleteSettingAsync<HelloWorldSettings>();
        await base.UninstallAsync();
    }
}
InstallAsync runs once, when the plugin is installed from Local Plugins; UninstallAsync reverses it. There's also UpdateAsync, which nopCommerce calls automatically when it sees a higher Version in plugin.json for an already-installed plugin — the mechanism you'd use to run a migration without asking the merchant to uninstall and reinstall.
If your admin page needs its own URL rather than reusing a default admin route, add a route provider:
public class RouteProvider : IRouteProvider
{
    public void RegisterRoutes(IEndpointRouteBuilder endpointRouteBuilder)
    {
        endpointRouteBuilder.MapControllerRoute(
            "Plugin.Misc.HelloWorld.Configure",
            "Admin/HelloWorld/Configure",
            new { controller = "HelloWorld", action = "Configure" });
    }

    public int Priority => 0;
}
Do You Need a Custom Dependency Registrar?
Not always. nopCommerce's core services — ISettingService, IStoreContext, IWebHelper, and the rest — are already registered by the framework and can be injected straight into your plugin class or controller. You only need your own registrar when you introduce a new service or repository interface that isn't part of the core container. In that case, add a class implementing IDependencyRegistrar (from Nop.Core.Infrastructure.DependencyManagement) and give it an Order greater than zero, so it runs after nopCommerce's own default registrations instead of racing them.
Building the Admin Configuration Page
The configuration screen is a normal MVC controller living in the Admin area — the only unusual part is the attribute stack nopCommerce expects on it:
[AutoValidateAntiforgeryToken]
[AuthorizeAdmin]
[Area(AreaNames.ADMIN)]
public class HelloWorldController : BasePluginController
{
    private readonly ISettingService _settingService;
    private readonly IStoreContext _storeContext;

    public async Task<IActionResult> Configure()
    {
        var storeId = await _storeContext.GetActiveStoreScopeConfigurationAsync();
        var settings = await _settingService.LoadSettingAsync<HelloWorldSettings>(storeId);

        return View("~/Plugins/Misc.HelloWorld/Views/Configure.cshtml", settings);
    }
}ISettings, persisted per-store through ISettingService. This is what InstallAsync seeds and Configure loads and saves.BasePluginController gives you the admin-area conventions for free; the matching Configure.cshtml needs its own _ViewImports.cshtml alongside it to resolve the admin theme's tag helpers.Point GetConfigurationPageUrl() from the previous section at this same Configure action, and nopCommerce will surface a working "Configure" link next to your plugin on the Local Plugins page automatically.
Installing, Testing, and Debugging Your Plugin
Once the project builds, deploy the output to \Nop.Web\Plugins\{YourOutputFolder} — this is exactly what the OutputPath in your .csproj already does for a local build — and restart the application so nopCommerce's plugin discovery picks it up. From there:
Before You Chase a "Plugin Not Found" Bug
-
✓Confirm the DLL and its dependencies actually landed in
Nop.Web\Plugins\{YourFolder}— not just in your project's ownbinfolder. -
✓
plugin.jsonis present next to the DLL and set to copy on build. -
✓
Configure.cshtmland_ViewImports.cshtmlare both set to copy on build (see the gotcha above). -
✓The application was restarted after copying files — nopCommerce discovers plugins at startup, not on a file-watcher.
-
✓The plugin shows up under Configuration → Local Plugins, and you've clicked Install (then restarted once more).
For debugging, set Nop.Web as your startup project and attach normally — your plugin's assembly loads into the same process, so breakpoints in a plugin controller or settings class behave exactly like breakpoints in core code. A poorly disposed dependency inside a plugin is also one of the more common causes we walk through in our nopCommerce high memory usage fix guide — worth a read once your plugin does anything beyond static configuration.
Packaging and Deployment Considerations
How you get a finished plugin onto a live store matters as much as how you built it. nopCommerce supports a few paths, and they trade off setup effort against consistency:
| Method | Best For | Consistency Risk |
|---|---|---|
| Manual folder copy | Local development and quick iteration | Medium — easy to miss a file |
| Admin "Upload plugin or theme" | Staging or single-store production deploys | Low — packaged as one archive |
| CI/CD packaged artifact | Multi-environment or multi-store rollouts | Low — same artifact every environment |
Whichever path you choose, test the install on a staging copy of the store first — installing a plugin restarts the application, and you don't want that surprise during business hours on a live storefront. If you're deciding between building this in-house versus extending an existing platform at all, that's a broader question we cover in our nopCommerce vs Shopify comparison.
Need a nopCommerce Developer? Hire the BSS Team
From custom plugins and theme work to full-store builds and performance tuning, our dedicated nopCommerce engineers ship production-grade code. Tell us what you need and we'll match you with the right developer.
Frequently Asked Questions
ISettingService and IStoreContext are already registered and injectable. You only touch Autofac directly if you introduce a brand-new service interface and need a custom IDependencyRegistrar to register it.IPlugin is the base contract every nopCommerce plugin implements, usually via BasePlugin. IMiscPlugin is a specialized marker interface for plugins that don't fit the payment, shipping, tax, or widget categories — it's the default choice for a general-purpose extension.Nop.Web/Plugins/{YourFolder}, plugin.json is missing or malformed, or the application wasn't restarted after the files were copied. nopCommerce discovers plugins at startup, so a restart is non-negotiable.Version field in plugin.json and implement UpdateAsync in your plugin class. nopCommerce calls it automatically for an already-installed plugin once it detects a higher version number, which is the standard place to run a settings or database migration..csproj needs TargetFramework set to net9.0. The IPlugin contract, install/uninstall lifecycle, and admin wiring described here are unchanged from recent versions.Final Thoughts
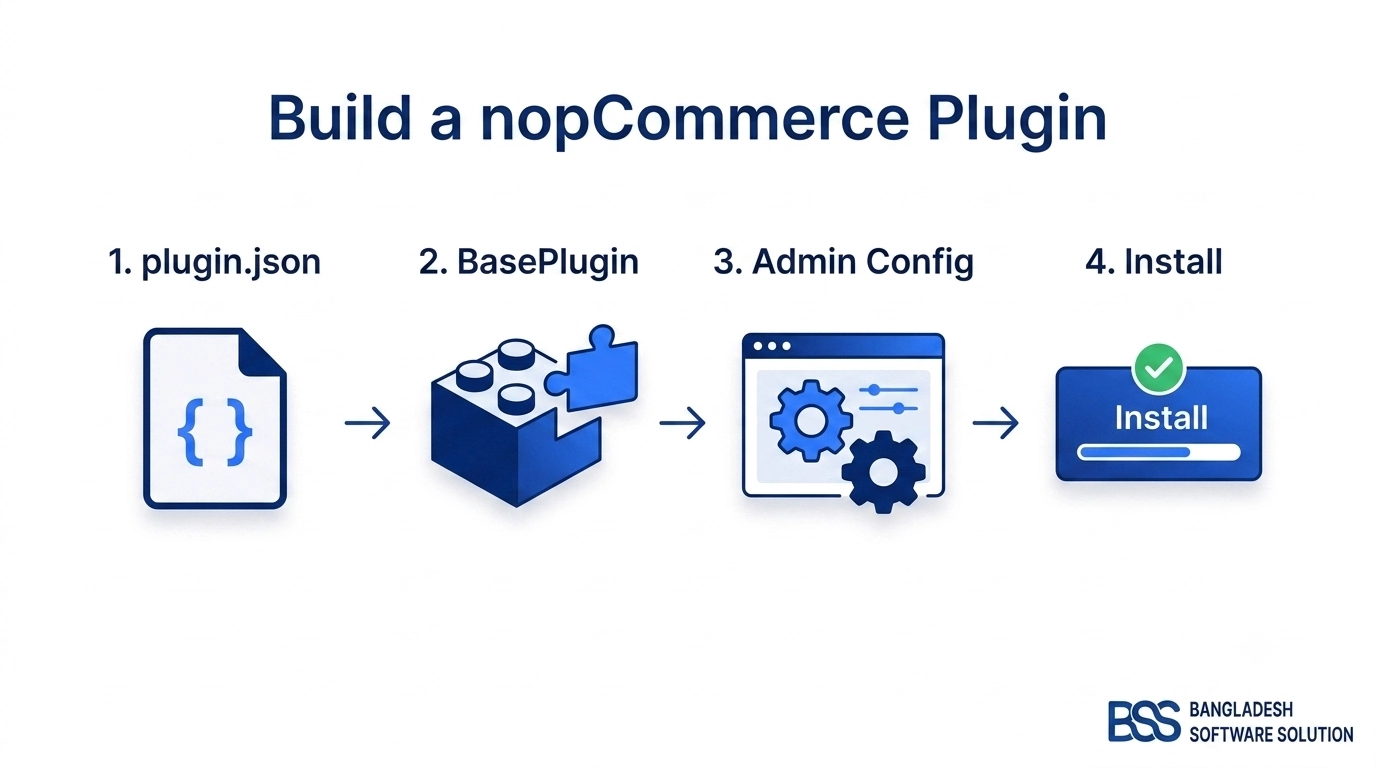
A nopCommerce plugin is four pieces working together: a descriptor (plugin.json) that makes it discoverable, a BasePlugin class that handles its lifecycle, an admin controller and view for configuration, and — for anything that renders on the storefront or processes an order — one of the specialized interfaces covered above. Once those pieces click, adding a second plugin is a lot faster than the first one, because the scaffolding is identical every time.
If you'd rather have a plugin scoped, built, and tested by people who do this daily, our nopCommerce development services cover everything from a proof of concept to a production release.