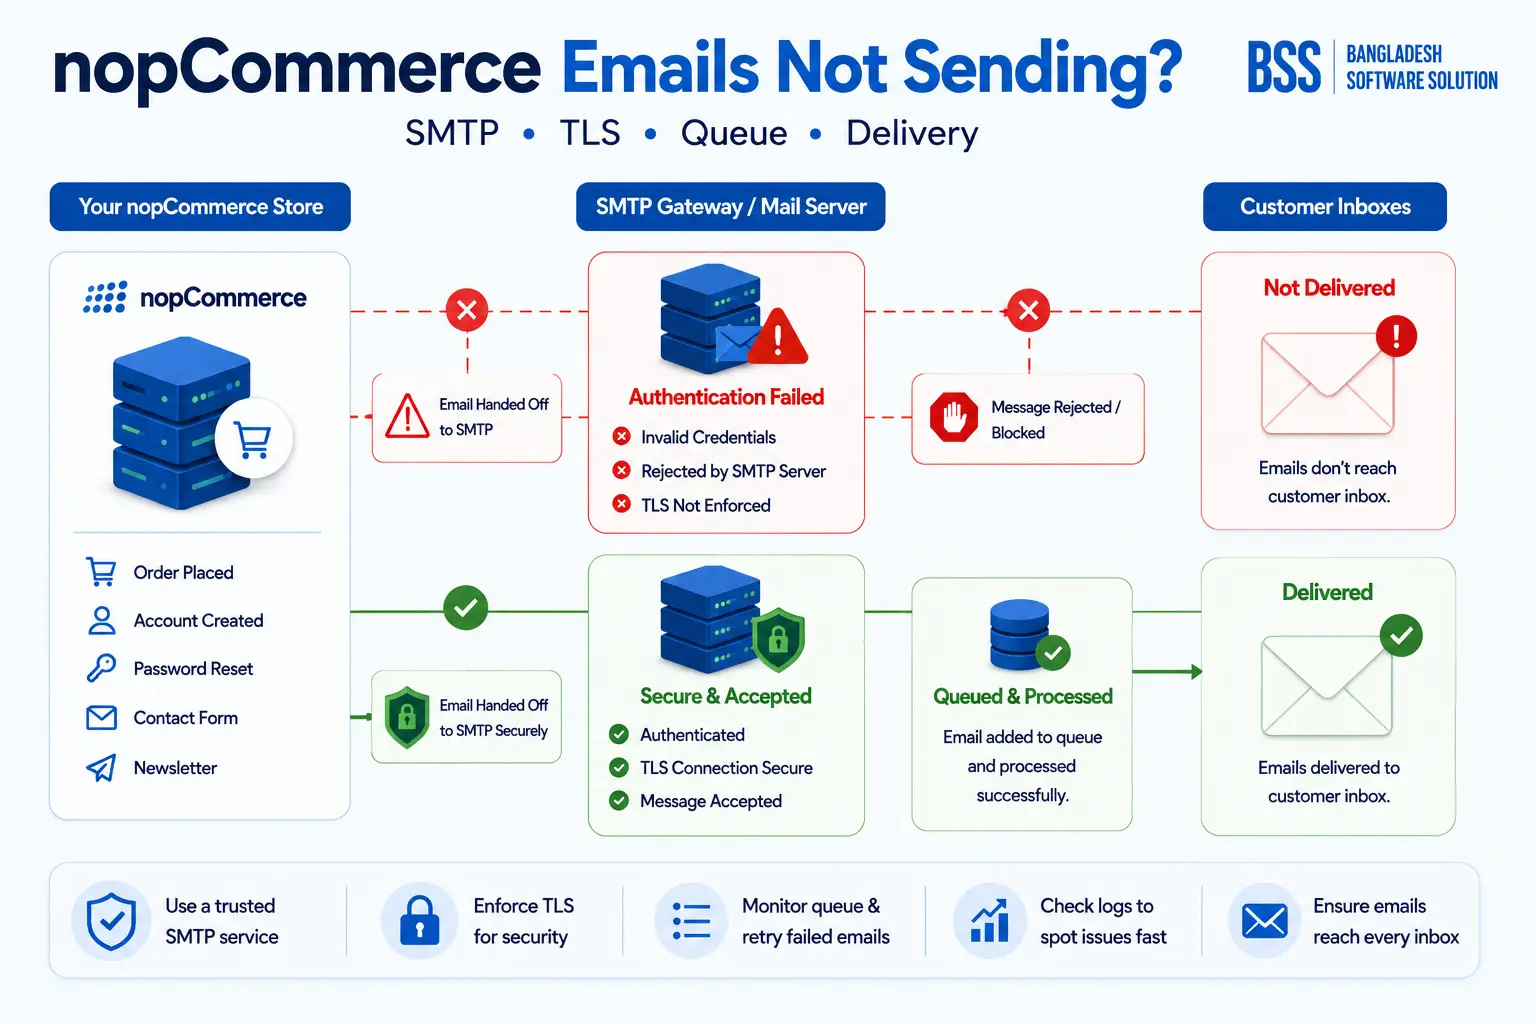
An order completes, but the customer never receives confirmation. Password-reset messages stay pending, contact notifications disappear, or the nopCommerce test email returns an authentication or connection error. When nopCommerce sending emails failed, the failure can occur before SMTP, during the SMTP session, inside the message queue, or after the provider accepts the message.
The fastest diagnosis is to test each boundary in order: email-account configuration, network connection, TLS and authentication, immediate test send, queued delivery, template assignment, and final inbox acceptance. Changing several fields at once destroys the evidence.
Start here: go to Configuration → Email accounts, edit the account used by the store, verify every value against the provider’s current SMTP instructions, save, and send a test message to a mailbox you control.
Record the exact error text and timestamp before making changes. “Connection refused,” “authentication failed,” and “accepted but not delivered” require different fixes.
Classify Where Email Delivery Stops
Before editing SMTP fields, establish which layer is failing. This prevents a disabled scheduled task from being mistaken for a bad password or a spam-folder problem from being treated as a network outage.
The nopCommerce test button is the first dividing line. If the test fails immediately, focus on the email account and network. If it succeeds but transactional mail does not, move to message templates, the queue, and scheduled tasks.
1. Verify the nopCommerce Email Account
In Configuration → Email accounts, confirm the outgoing address, display name, SMTP host, port, encryption option, authentication method, username, secret, and maximum messages per batch. Do not copy settings from a different mail client without checking the provider’s server-side SMTP requirements.
| Field | What to verify | Typical failure |
|---|---|---|
| Email address | Authorized mailbox or configured sending alias | Sender rejected or rewritten |
| Host | Exact SMTP hostname, without URL scheme or path | DNS or connection failure |
| Port | Provider’s submission port and matching encryption mode | Timeout or TLS handshake error |
| Authentication | No auth, NTLM, login/password, Google OAuth2, or Microsoft OAuth2 as required | 535/authentication failure |
| User/secret | Current SMTP identity and app-specific credential where required | Invalid credentials |
Some providers require the From address to be the authenticated mailbox or a verified alias. A correct password does not authorize arbitrary sender addresses. Save the account before using Send test email.
2. Match the SMTP Port, TLS Mode, and Provider Policy
Port and encryption must be treated as one configuration. Providers commonly offer authenticated message submission with TLS, but the exact port and whether the connection starts encrypted or upgrades with STARTTLS are provider-specific. Use the settings documented for that mailbox or relay.
A certificate-name error can indicate the wrong hostname, TLS interception, an outdated server trust store, or a provider endpoint change. Do not bypass certificate validation. Correct the endpoint, operating-system certificates, proxy, or inspection policy.
Avoid unauthenticated port 25 for application mail
Cloud platforms and hosting providers frequently restrict outbound TCP 25. Microsoft recommends authenticated SMTP relay—typically on port 587—for Azure workloads. Verify your environment rather than assuming a local server test represents production.
3. Fix Authentication, App Passwords, or OAuth2
A normal mailbox password may no longer work when the provider disables basic SMTP authentication, enforces multifactor authentication, or requires an application-specific password. Confirm that SMTP sending is enabled for the mailbox and tenant, then choose the nopCommerce authentication method that matches the provider.
Current nopCommerce email accounts support login/password plus Google and Microsoft OAuth2 configurations. OAuth requires correctly registered client credentials, tenant or account settings, redirect/consent completion where applicable, and permission for the intended mailbox. Rotate an expired client secret before changing unrelated SMTP fields.
Authentication checks
- 1Confirm the username format required by the provider—often the full mailbox address.
- 2Verify SMTP AUTH or authenticated relay is enabled for this mailbox and tenant.
- 3Use an app password only when the provider explicitly supports and requires it.
- 4For OAuth2, verify tenant, client ID, client secret, consent, and secret expiry.
- 5Ensure the configured From address is an allowed mailbox or verified alias.
4. Test SMTP Connectivity from the nopCommerce Host
A laptop reaching the SMTP server proves nothing about the production host. Test DNS and TCP connectivity from the same VM, container, IIS server, or cloud environment that runs nopCommerce.
Resolve-DnsName smtp.example.com
Test-NetConnection smtp.example.com -Port 587
A successful TCP test only proves that the port is reachable; it does not validate TLS, credentials, sender permissions, or delivery. A timeout points to firewall, network security group, hosting policy, DNS, proxy, or provider allow-listing. Check outbound rules as well as inbound rules.
If the store runs in Azure, use an authenticated relay on an allowed submission port instead of designing around unrestricted port 25. Our nopCommerce hosting guide helps map this check to the wider deployment environment.
5. Inspect the Message Queue and Scheduled Task
nopCommerce queues transactional emails unless a template is configured to send immediately. Open System → Message queue, filter to unsent messages, and inspect the send attempts, From/To addresses, subject, body, and timestamps.
If test email works but queued messages accumulate, open System → Schedule tasks. Verify the queued-email task is enabled, review its last run and error, use Run now during diagnosis, and restart the application after changing task configuration as directed by nopCommerce documentation.
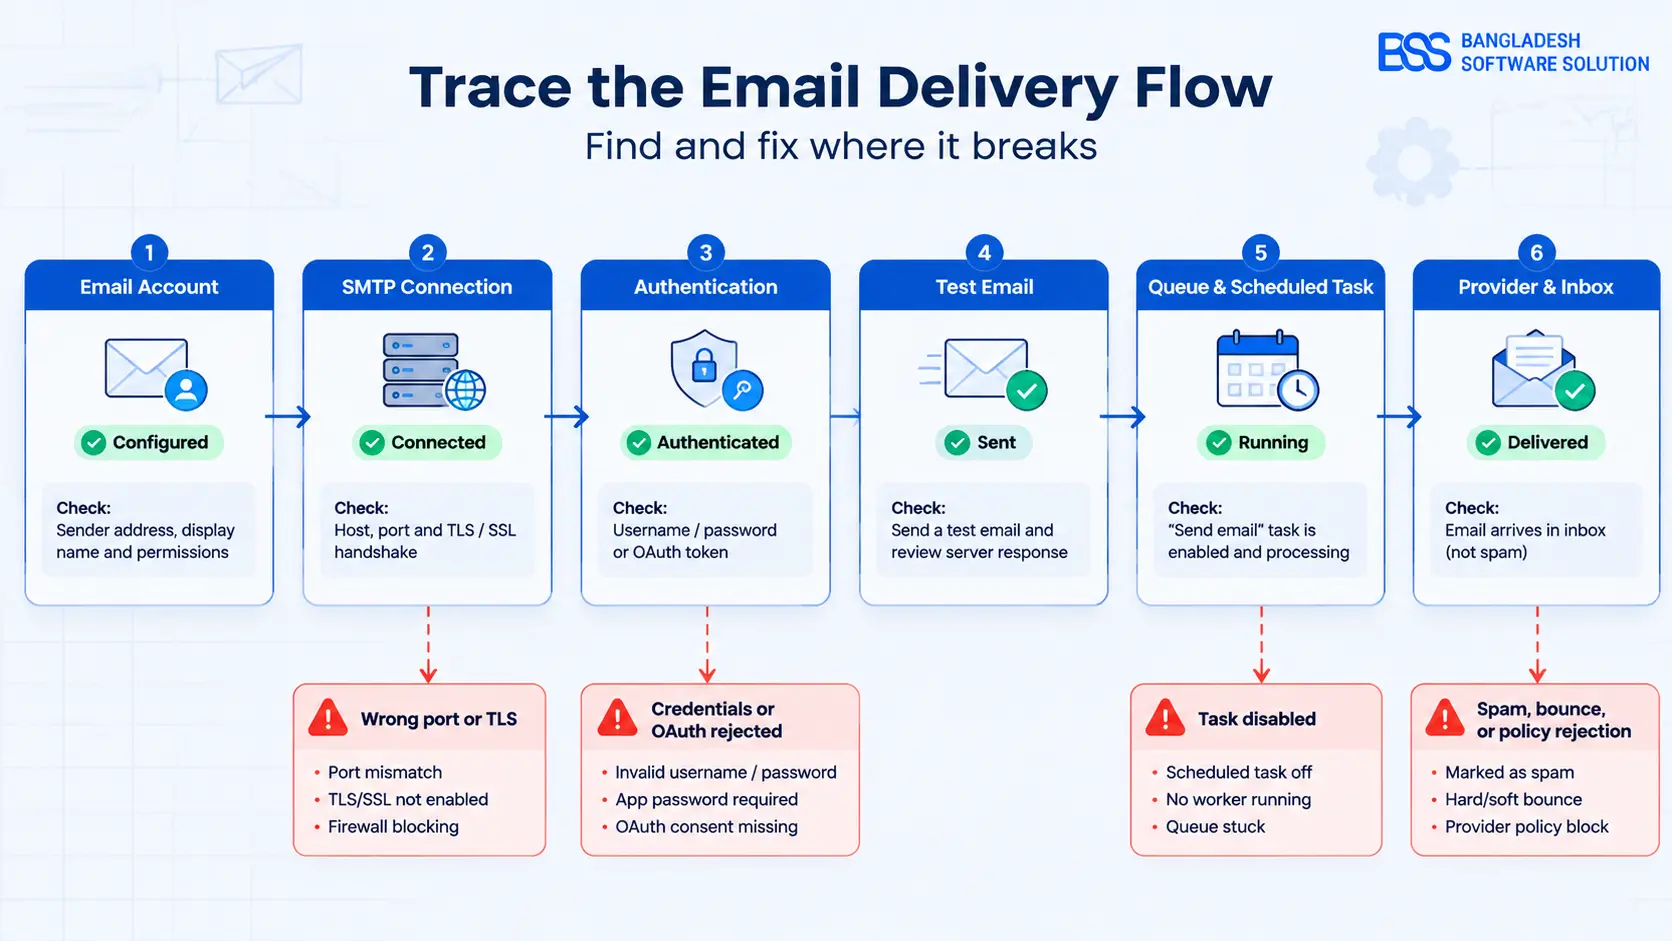
Requeue a failed message only after correcting the cause. Repeated retries against invalid credentials or a blocked provider can trigger throttling and obscure the original error.
6. Check Message Templates and Store Mapping
Go to Content management → Message templates. Confirm the required template is active, assigned to the intended store and language, and mapped to the correct email account. Check whether it sends immediately or enters the queue.
Use Test template with realistic token values. A successful generic account test does not prove that a specific template is active, properly assigned, or generating valid recipient data. In multi-store setups, verify each store’s template restrictions and sender account independently.
For deployment changes that affect plugins, templates, or scheduled work, use the staging discipline in our nopCommerce compatibility testing guide.
7. Separate SMTP Success from Inbox Delivery
If nopCommerce reports success and the provider accepts the message, the application has completed its SMTP responsibility. Missing inbox delivery is now a provider or recipient-policy problem. Check the provider activity log, bounce event, suppression list, spam folder, quarantine, rate limit, and recipient rejection details.
Authenticate the sending domain with the DNS records required by the provider, normally including SPF and DKIM, then publish a considered DMARC policy. Keep transactional From addresses stable and avoid sending unauthenticated mail directly from a low-reputation server IP.
Do not mark a test complete at “250 Accepted”
Confirm the message reaches the intended mailbox, renders correctly, preserves links, and produces no bounce or provider warning. Test at more than one recipient domain before production launch.
8. Use Logs Without Exposing Credentials
Review System → Log around the exact failure timestamp and correlate it with the message queue and provider logs. Preserve the exception type, SMTP status code, and inner exception, but redact usernames, access tokens, client secrets, passwords, recipient data, and full message bodies before sharing diagnostics.
After the fix, rotate any secret that was pasted into tickets, chat, screenshots, or shell history. Use a dedicated transactional mailbox or relay identity with the minimum permissions required.
Production Verification Checklist
Verify more than one test message
- 1Email-account test succeeds from the production host.
- 2Queued-email scheduled task runs successfully and the queue drains.
- 3Order, account, password-reset, contact, and administrator notifications use the correct template and sender.
- 4Messages arrive at multiple recipient providers without bounce or quarantine.
- 5SPF, DKIM, DMARC, From, Reply-To, links, and branding are correct.
- 6Provider limits, secret expiry, queue growth, and scheduled-task failures are monitored.
Transactional Emails Still Failing?
BSS Engineering can trace SMTP connectivity, authentication, queued messages, scheduled tasks, templates, hosting restrictions, and deliverability—then verify the complete path to the recipient inbox.
Frequently Asked Questions
Final Thoughts
A nopCommerce email failure becomes manageable once you identify the exact stage where delivery stops. Start with the email-account test, then follow the message through templates, queue processing, the scheduled task, the SMTP provider, and finally the recipient system.
Change one variable at a time and verify the production host—not only a local machine. If the fault crosses nopCommerce configuration, hosting policy, OAuth, and domain authentication, BSS nopCommerce services can trace and validate the entire delivery path.