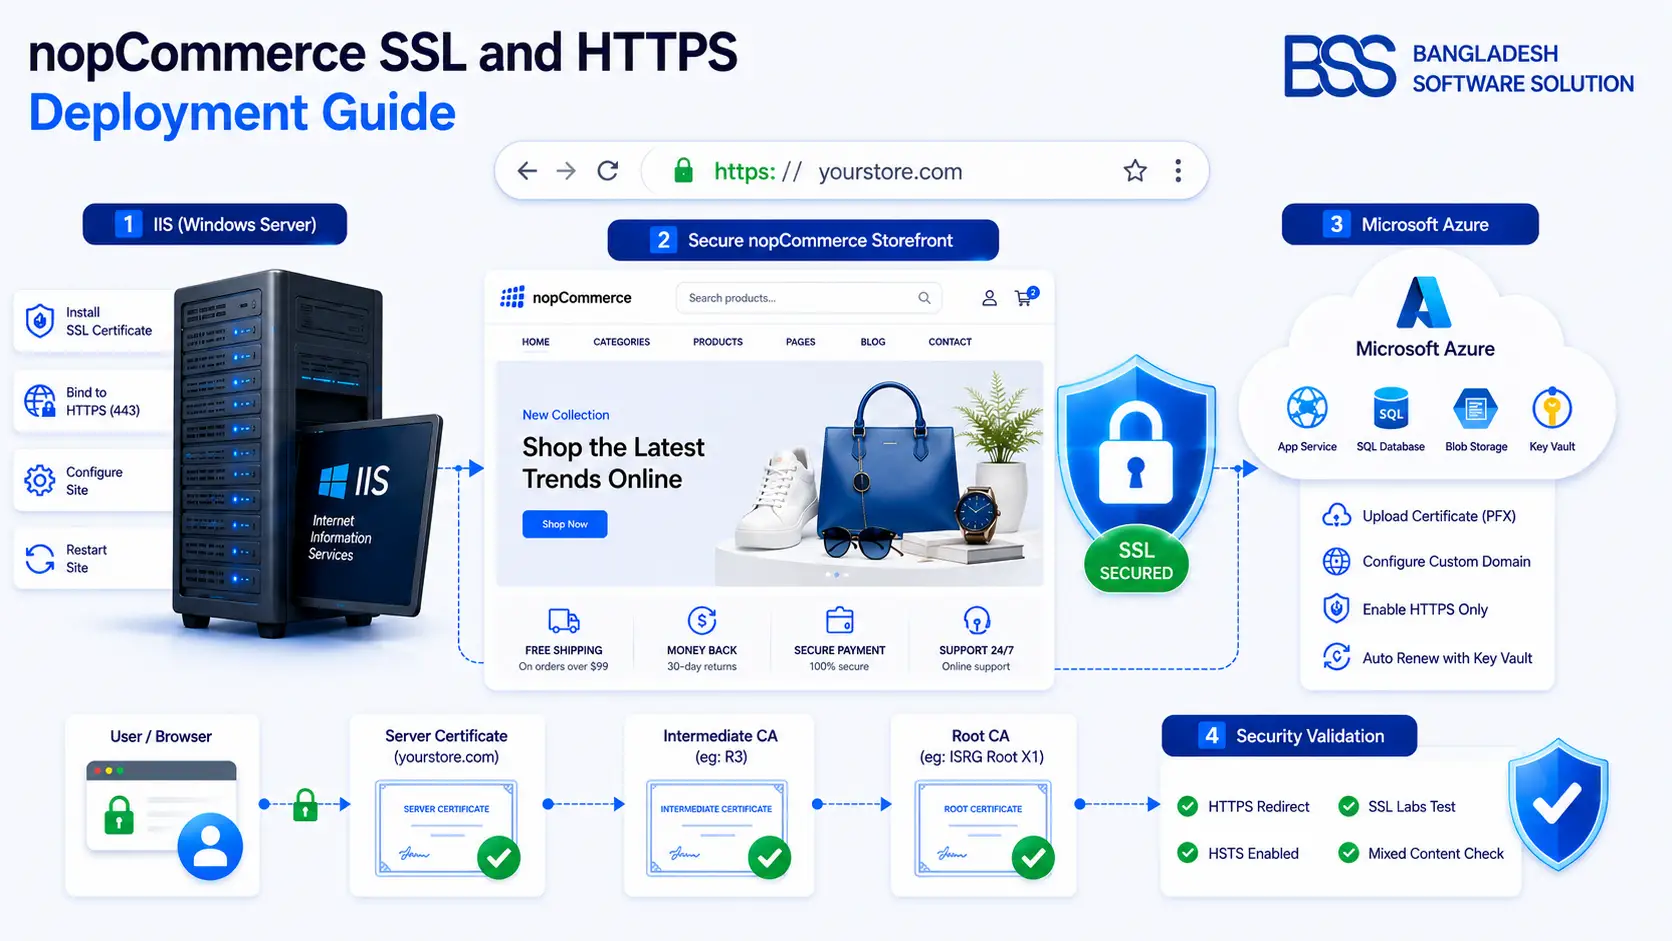
HTTPS is not a cosmetic switch. A correct nopCommerce SSL setup protects sign-in, checkout, account, and administration traffic while giving the application the request scheme it needs to generate secure URLs. A partial setup can create redirect loops, mixed content, broken callbacks, or an inaccessible admin area.
The safe order is: validate the certificate, make the web server answer on HTTPS, test that endpoint, then update nopCommerce and enable redirects. Never enable SSL in nopCommerce before a working certificate and HTTPS binding exist.
Deployment rule: keep an admin session open, take a configuration backup, and retain a tested rollback path until storefront, checkout, admin, scheduled tasks, and integrations pass over HTTPS.
Before You Start: Choose Where TLS Terminates
Identify the component that owns the public certificate. With a direct Windows deployment, TLS normally terminates in IIS. Azure App Service terminates TLS at its managed front end. A load balancer, application gateway, reverse proxy, or CDN can terminate it earlier.
Inventory every public hostname, including www, the bare domain, alternate store domains, and API hosts. Record current DNS, bindings, Store URL, and redirect rules before changing anything.
1. Obtain and Validate the SSL Certificate
Use a certificate issued for every public hostname. For IIS, obtain a PFX containing the private key and certificate chain. For Azure, choose an App Service managed certificate, App Service certificate, or compatible uploaded certificate. Confirm eligibility before relying on a managed certificate.
Certificate acceptance checks
- 1The subject or SAN covers every production hostname.
- 2The validity period and trust chain are correct.
- 3The private key exists where TLS terminates.
- 4Renewal ownership, monitoring, and emergency replacement are documented.
Never put a private key in source control or the web root. Restrict access to PFX files and passwords, and remove temporary copies after import.
2. Configure nopCommerce HTTPS on IIS
Import and bind the certificate
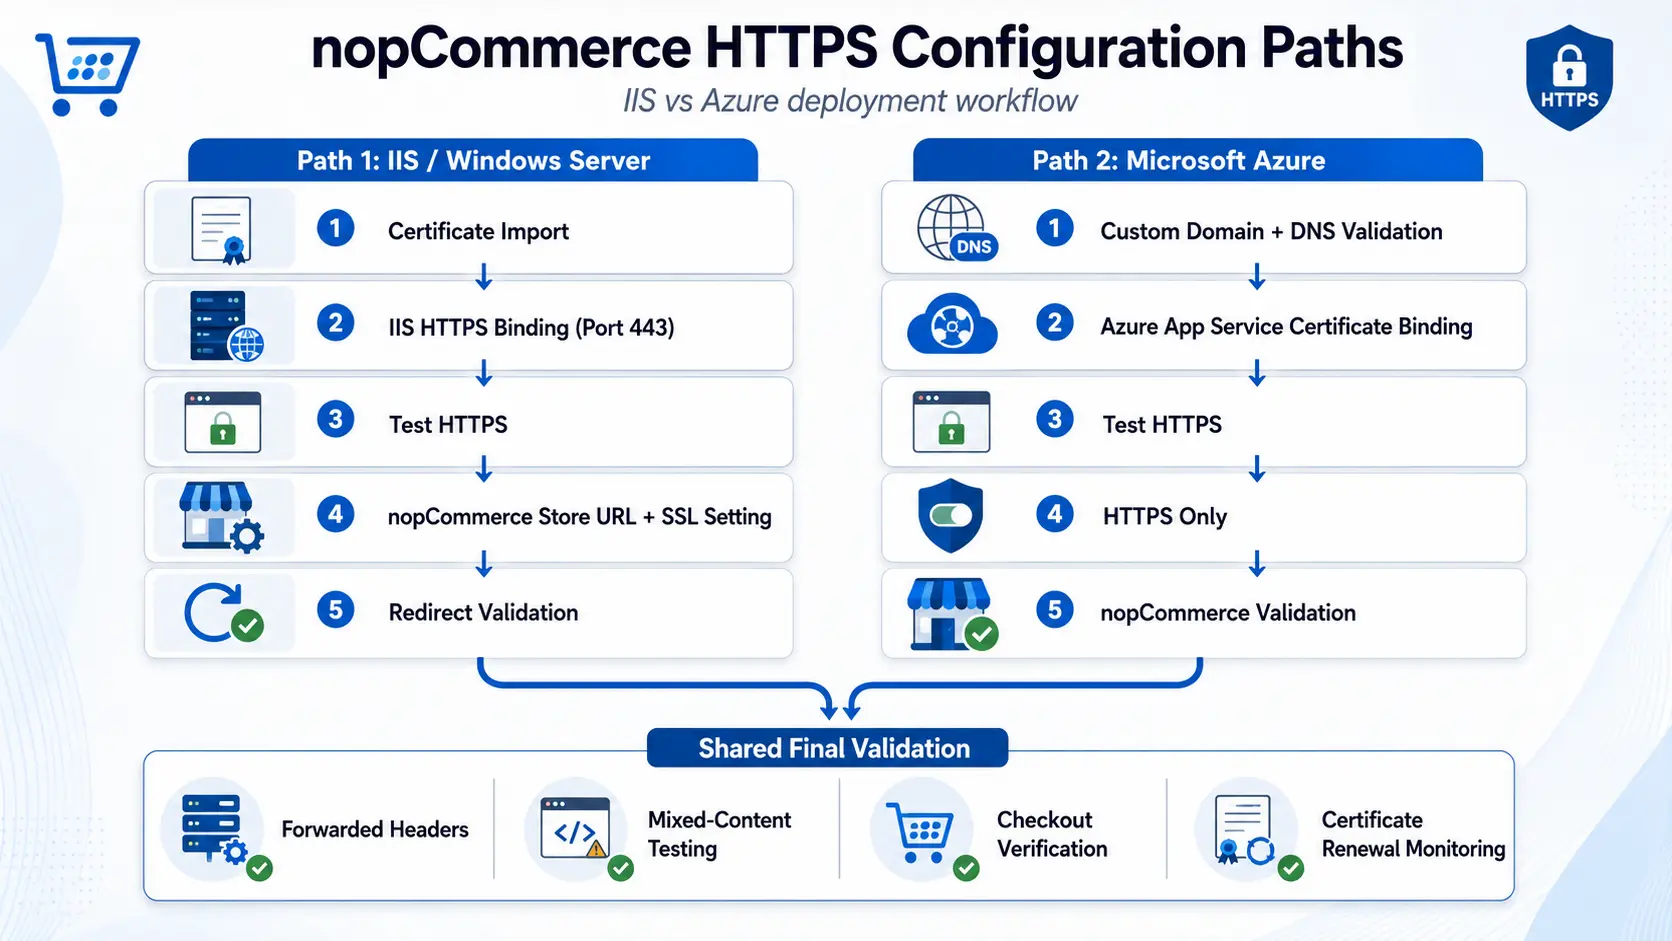
Import the PFX into the Local Computer certificate store, normally Personal. Confirm it under IIS Server Certificates. Open the nopCommerce site, choose Bindings, and add an https binding on port 443. Select the correct hostname and certificate. When sites share an IP, use SNI and verify client compatibility.
Test before redirecting
Browse directly to the HTTPS URL. Inspect the certificate, assets, admin login, cart, and checkout. Do not add a blanket redirect until this succeeds.
Choose one redirect owner
Redirect HTTP to the canonical HTTPS hostname at one layer—IIS URL Rewrite, an edge proxy, or nopCommerce. Preserve the path and query string, handle health probes deliberately, and use a temporary redirect during testing before moving to a permanent redirect. Multiple redirect owners commonly create loops.
3. Configure HTTPS on Azure App Service
Map the custom domain first. Add the required DNS records, complete ownership validation, and wait until Azure reports the hostname as valid. Then select that hostname and certificate and create the TLS binding. SNI SSL is normal for modern clients; IP-based SSL serves special compatibility requirements.
Bind a certificate to every exposed custom hostname. Validate each HTTPS URL before enabling HTTPS Only. If Azure Front Door, Application Gateway, or a CDN sits in front, decide which layer owns redirects and verify its origin protocol.
4. Update the nopCommerce Store URL and SSL Setting
After HTTPS works, go to Configuration → Stores, edit the store, change Store URL to the canonical https:// address, and enable SSL. Ensure the hostname matches the certificate and redirect target.
Avoid admin lockout
nopCommerce documentation recommends installing the certificate before enabling SSL. Keep your admin session open and retain a supported database or configuration recovery route.
For multi-store installations, verify every mapping, hostname, binding, certificate, and Store URL independently. Clear cache or restart gracefully only when required by your version and deployment procedure.
5. Configure Forwarded Headers Behind a Proxy
When TLS terminates before nopCommerce, the backend may receive HTTP although the visitor used HTTPS. ASP.NET Core must receive and trust the original scheme, commonly through X-Forwarded-Proto, or the application can generate HTTP URLs and redirect loops.
IIS hosting integrates through the ASP.NET Core Module. For other proxies or multi-hop designs, configure Forwarded Headers Middleware early and trust only known proxy IPs or networks. Current ASP.NET Core servicing releases ignore forwarded headers from unknown proxies, so upgrades can expose an incomplete trust configuration.
app.UseForwardedHeaders();
app.UseHttpsRedirection();
// authentication, routing, and endpoints follow
Follow the Microsoft guidance for your exact runtime. Never trust every forwarded header on an internet-facing app.
6. Remove Mixed Content and Insecure URLs
Search themes, plugins, topic HTML, email templates, and configuration for hard-coded http:// resources. Fix scripts, styles, images, fonts, iframes, API calls, payment and identity callbacks, webhooks, sitemap and canonical output, CDN origins, and analytics settings.
Browser DevTools should show no mixed-content warnings. Prefer HTTPS canonical URLs or safe application-relative paths. Use our nopCommerce compatibility testing guide for staging checks.
7. Verify Redirects, Security, and Store Workflows
| Test | Expected result | Common failure |
|---|---|---|
| HTTP URL | One redirect to HTTPS; path/query preserved | Loop, chain, lost query, wrong host |
| HTTPS URL | Trusted certificate and full chain | Name mismatch, expiry, missing intermediate |
| Assets | No insecure requests | Hard-coded content URL |
| Store flows | Login, cart, checkout, payment return, admin, and email links work | Cookie, callback, scheme, or host mismatch |
| SEO | Canonical, sitemap, schema, and links use HTTPS | Old Store URL or cached URLs |
Test from a clean browser and with an HTTP client so cached HSTS or redirects do not hide the real response. Monitor expiry and test renewal end to end; renewal is incomplete until the new certificate is bound and served.
Rollback Plan
Record the old Store URL and SSL value, export IIS or Azure binding details, and retain the last working certificate. If HTTPS fails, restore the known-good binding and disable the new redirect. If the app loops, inspect proxy scheme forwarding and duplicate redirects before changing certificates.
Need a Zero-Downtime HTTPS Migration?
BSS Engineering can trace theme and plugin resource loading across Razor layouts, bundles, deployment artifacts, CDNs, and the browser cascade—then implement a fix that survives the next release.
Frequently Asked Questions
Final Thoughts
A reliable nopCommerce HTTPS migration follows a strict order: certificate, binding, direct HTTPS test, proxy awareness, Store URL and SSL setting, one redirect owner, then full workflow validation.
That sequence prevents most loops and lockouts while leaving a clean rollback at every stage. If your deployment spans IIS, Azure, a CDN, or multiple stores, BSS nopCommerce services can configure and validate the full delivery chain.